Once a Project has been created, the next step is to build the Estimate that will be used to prepare the customer Proposal. The Estimate should reflect the expected scope of work, quantities, labor, materials, equipment, and other costs as accurately as possible.
Training Videos
Watch both videos first for a complete walkthrough, or use the sections below as a step-by-step reference.
Creating an Estimate Video
Watch this walkthrough for a visual example of creating and updating an Estimate in OneCrew.
Creating, Editing, and Sending a Proposal Video
Watch this walkthrough for a visual example of creating, editing, and sending a Proposal in OneCrew.
Part 1: Build the Estimate
Create and review the Estimate that will serve as the financial and scope foundation for the customer Proposal.
Open a New Estimate
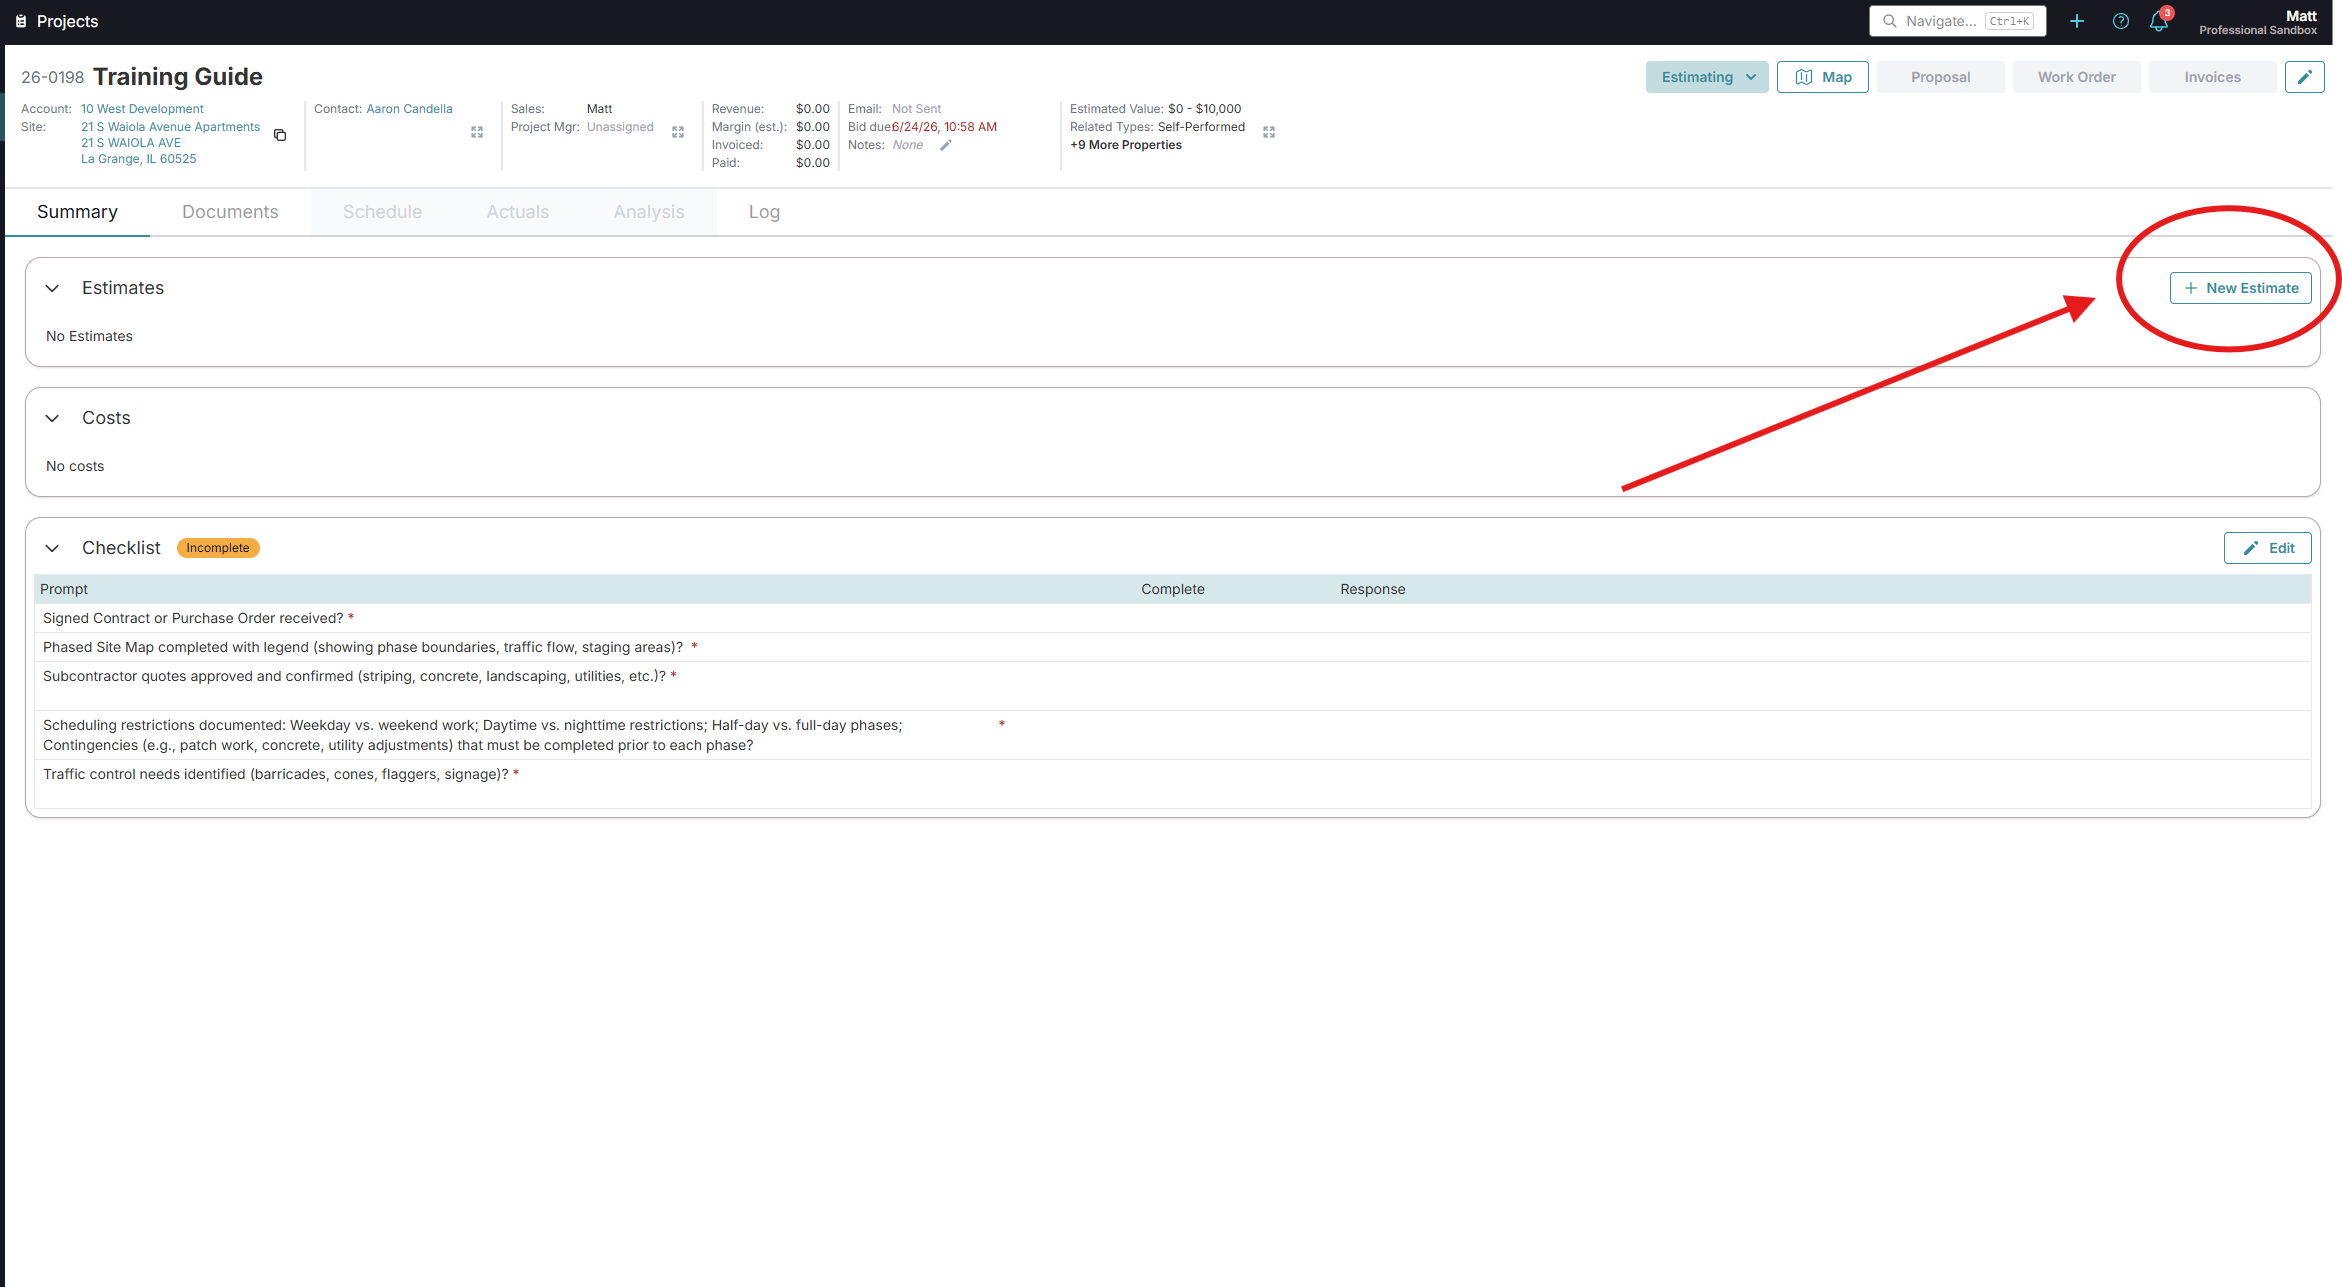
Open the Project and locate the Estimates section.
Click + New Estimate to begin.
OneCrew automatically names the Estimate using the Project name followed by Estimate. Update the name when needed to make the Estimate easy to identify. The first Estimate created for the Project is marked as Primary by default.
Start a new Estimate from the Estimates section of the Project page.
Add Services
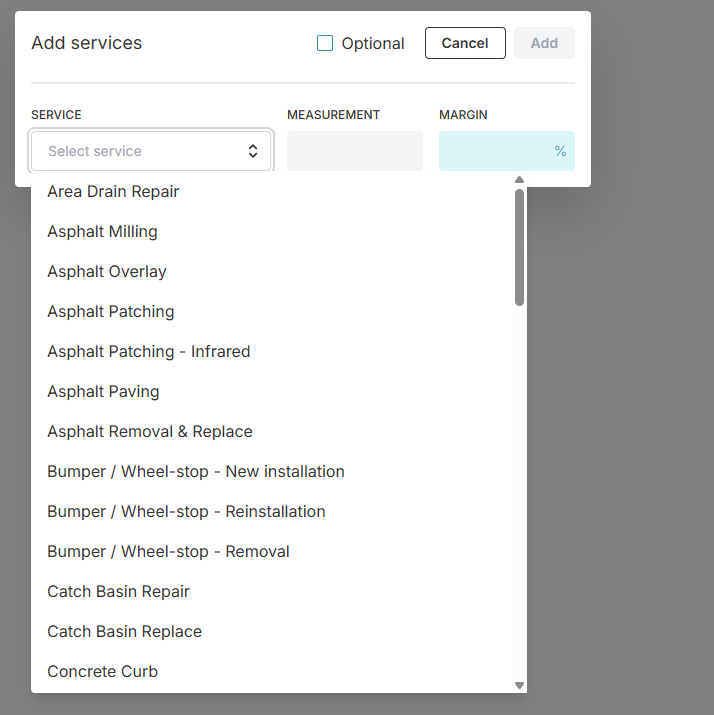
Click Add Service and select the Service or Service Set that matches the work being estimated.
You can scroll through the available Services or begin typing the Service name to filter the list.
Enter the measurement if it is already known, review the prepopulated margin, and click Add.
OneCrew automatically includes the default Service description. This description carries forward into the Proposal and can be reviewed or edited later.
Always select a predefined Service. Do not use a blank Service or blank Service Set.
Select the appropriate Service and review its measurement and margin before adding it.
Review and Adjust Costs
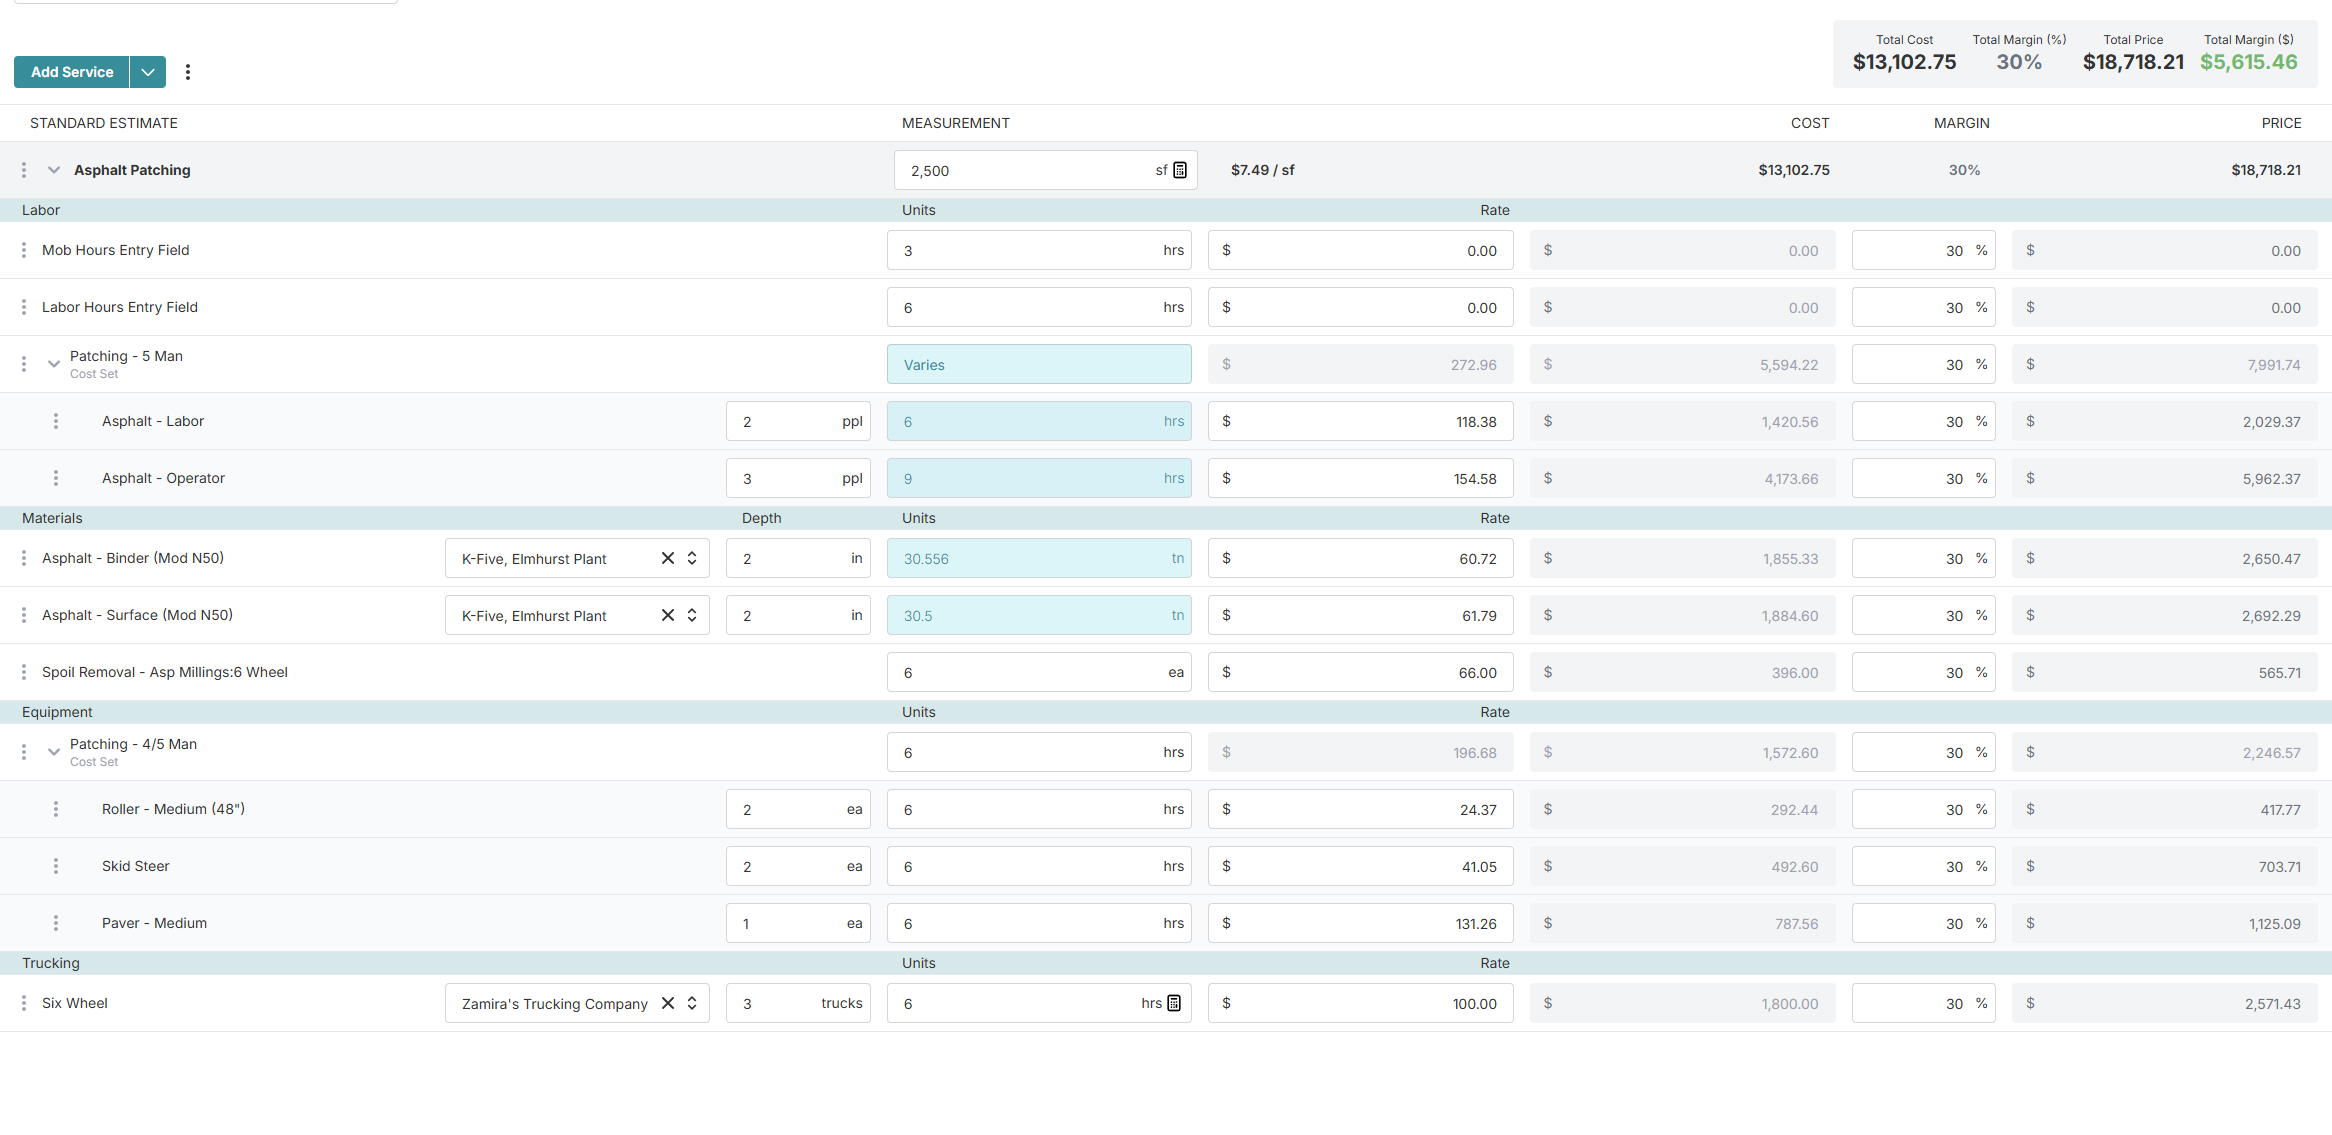
After a Service is added, it appears expanded so you can review the cost items associated with it. Click the Service heading to collapse or reopen the details.
OneCrew automatically populates the standard labor, material, equipment, and other costs based on the selected Service. Review the information carefully and update any editable fields needed for the specific Project.
Fields that are shaded gray cannot be changed. Blue fields are calculated automatically but may be overridden when necessary.
Review the cost details included with each Service.
Add, Remove, or Edit Costs
Additional costs can be added when the standard Service does not include everything required for the work.
To add a cost, hover over the appropriate cost category and click the plus option. Select the required cost, enter the relevant details, and click Add.
Use the three-dot menu beside an existing cost item to make common changes such as renaming, replacing, deleting, or resetting the cost.
Use the separate Margin Holds and Taxes training when those options are required.
Verify Materials and Labor
Review the Materials section and select the correct vendor for each material used on the Project.
OneCrew may calculate quantities automatically using the measurements and formulas assigned to the Service. Confirm that the quantities are reasonable before saving the Estimate.
Review the labor hours and crew quantities included with the Service. Update them as needed so they reflect the expected crew size and time required to complete the work.
Services automatically allocate labor, but labor can be customized as needed for the Project.
Save the Estimate
When the Estimate information is complete, click Save in the upper-right corner.
You can reopen the Estimate later to add or update information.
After the Estimate is saved, OneCrew changes the Project status from Lead to Estimating.
Optional Services
When adding a Service that is not part of the base scope, check Optional before clicking Add. The Service can then be presented to the customer as an optional selection in the Proposal.
Multiple Estimates
Create multiple Estimates when the customer should receive separate packages, scopes, or pricing options.
From the Project page, click New Estimate and build the additional Estimate using the same process. Each Estimate can contain a different combination of required and optional Services.
Part 2: Prepare and Send the Proposal
Organize the supporting files and use the completed Estimate to prepare the customer-facing Proposal.
Manage Supporting Documents
Upload supporting files to the Project before adding them to the Proposal. These files may include site maps, photos, PDFs, specifications, terms and conditions, or other Project documents.
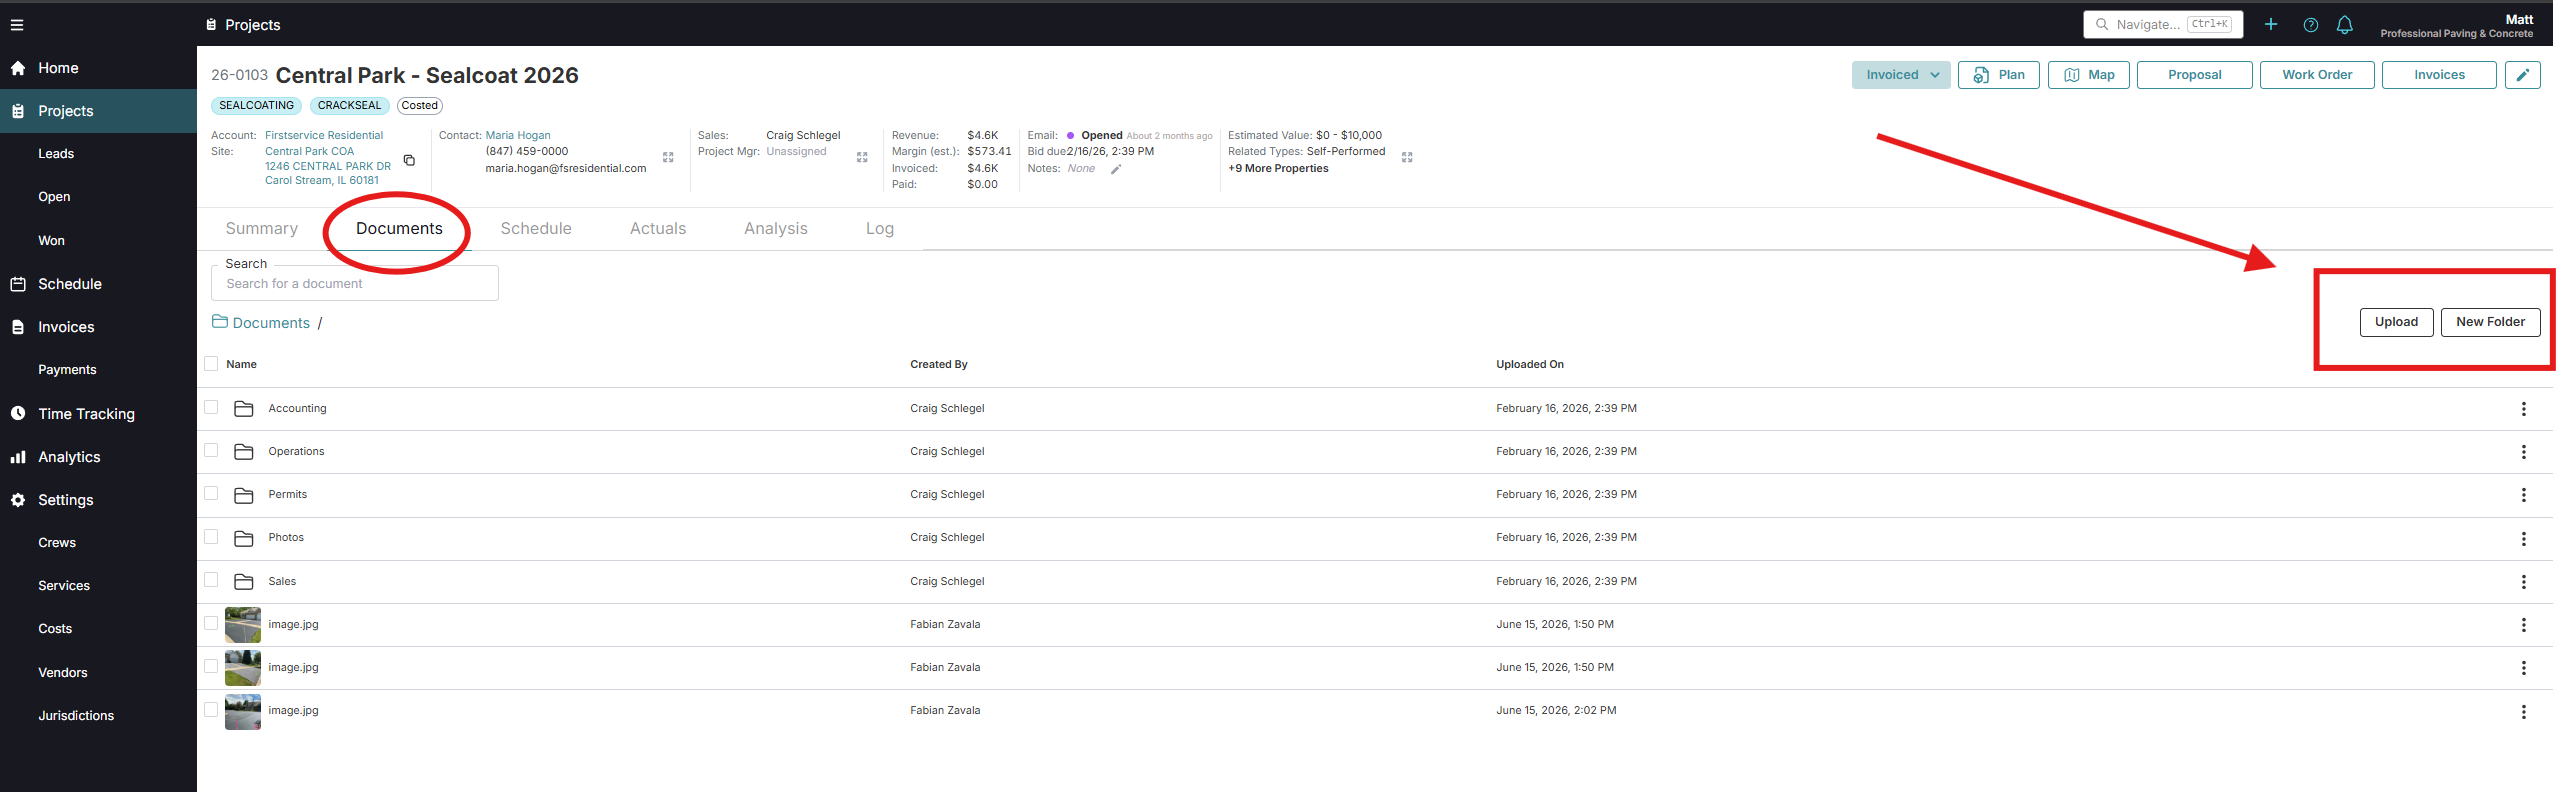
Open the Project and select the Documents tab.
Click Upload, or drag and drop files into the upload area.
Use the existing Project folder structure to keep files organized and easy to retrieve.
Files can be moved, renamed, deleted, or found using the Search field when needed.
Keep the folder structure consistent with your business unit. Avoid creating new folders unless they are part of the agreed team process.
Upload and organize supporting files in the Project Documents tab.
Add Documents and Organize the Proposal
All supporting files must first be uploaded to the Project's Documents tab before they can be added to the Proposal.
Project Documents
Use the Project Documents section for photos or other images where captions or notes may be needed.
Append Documents
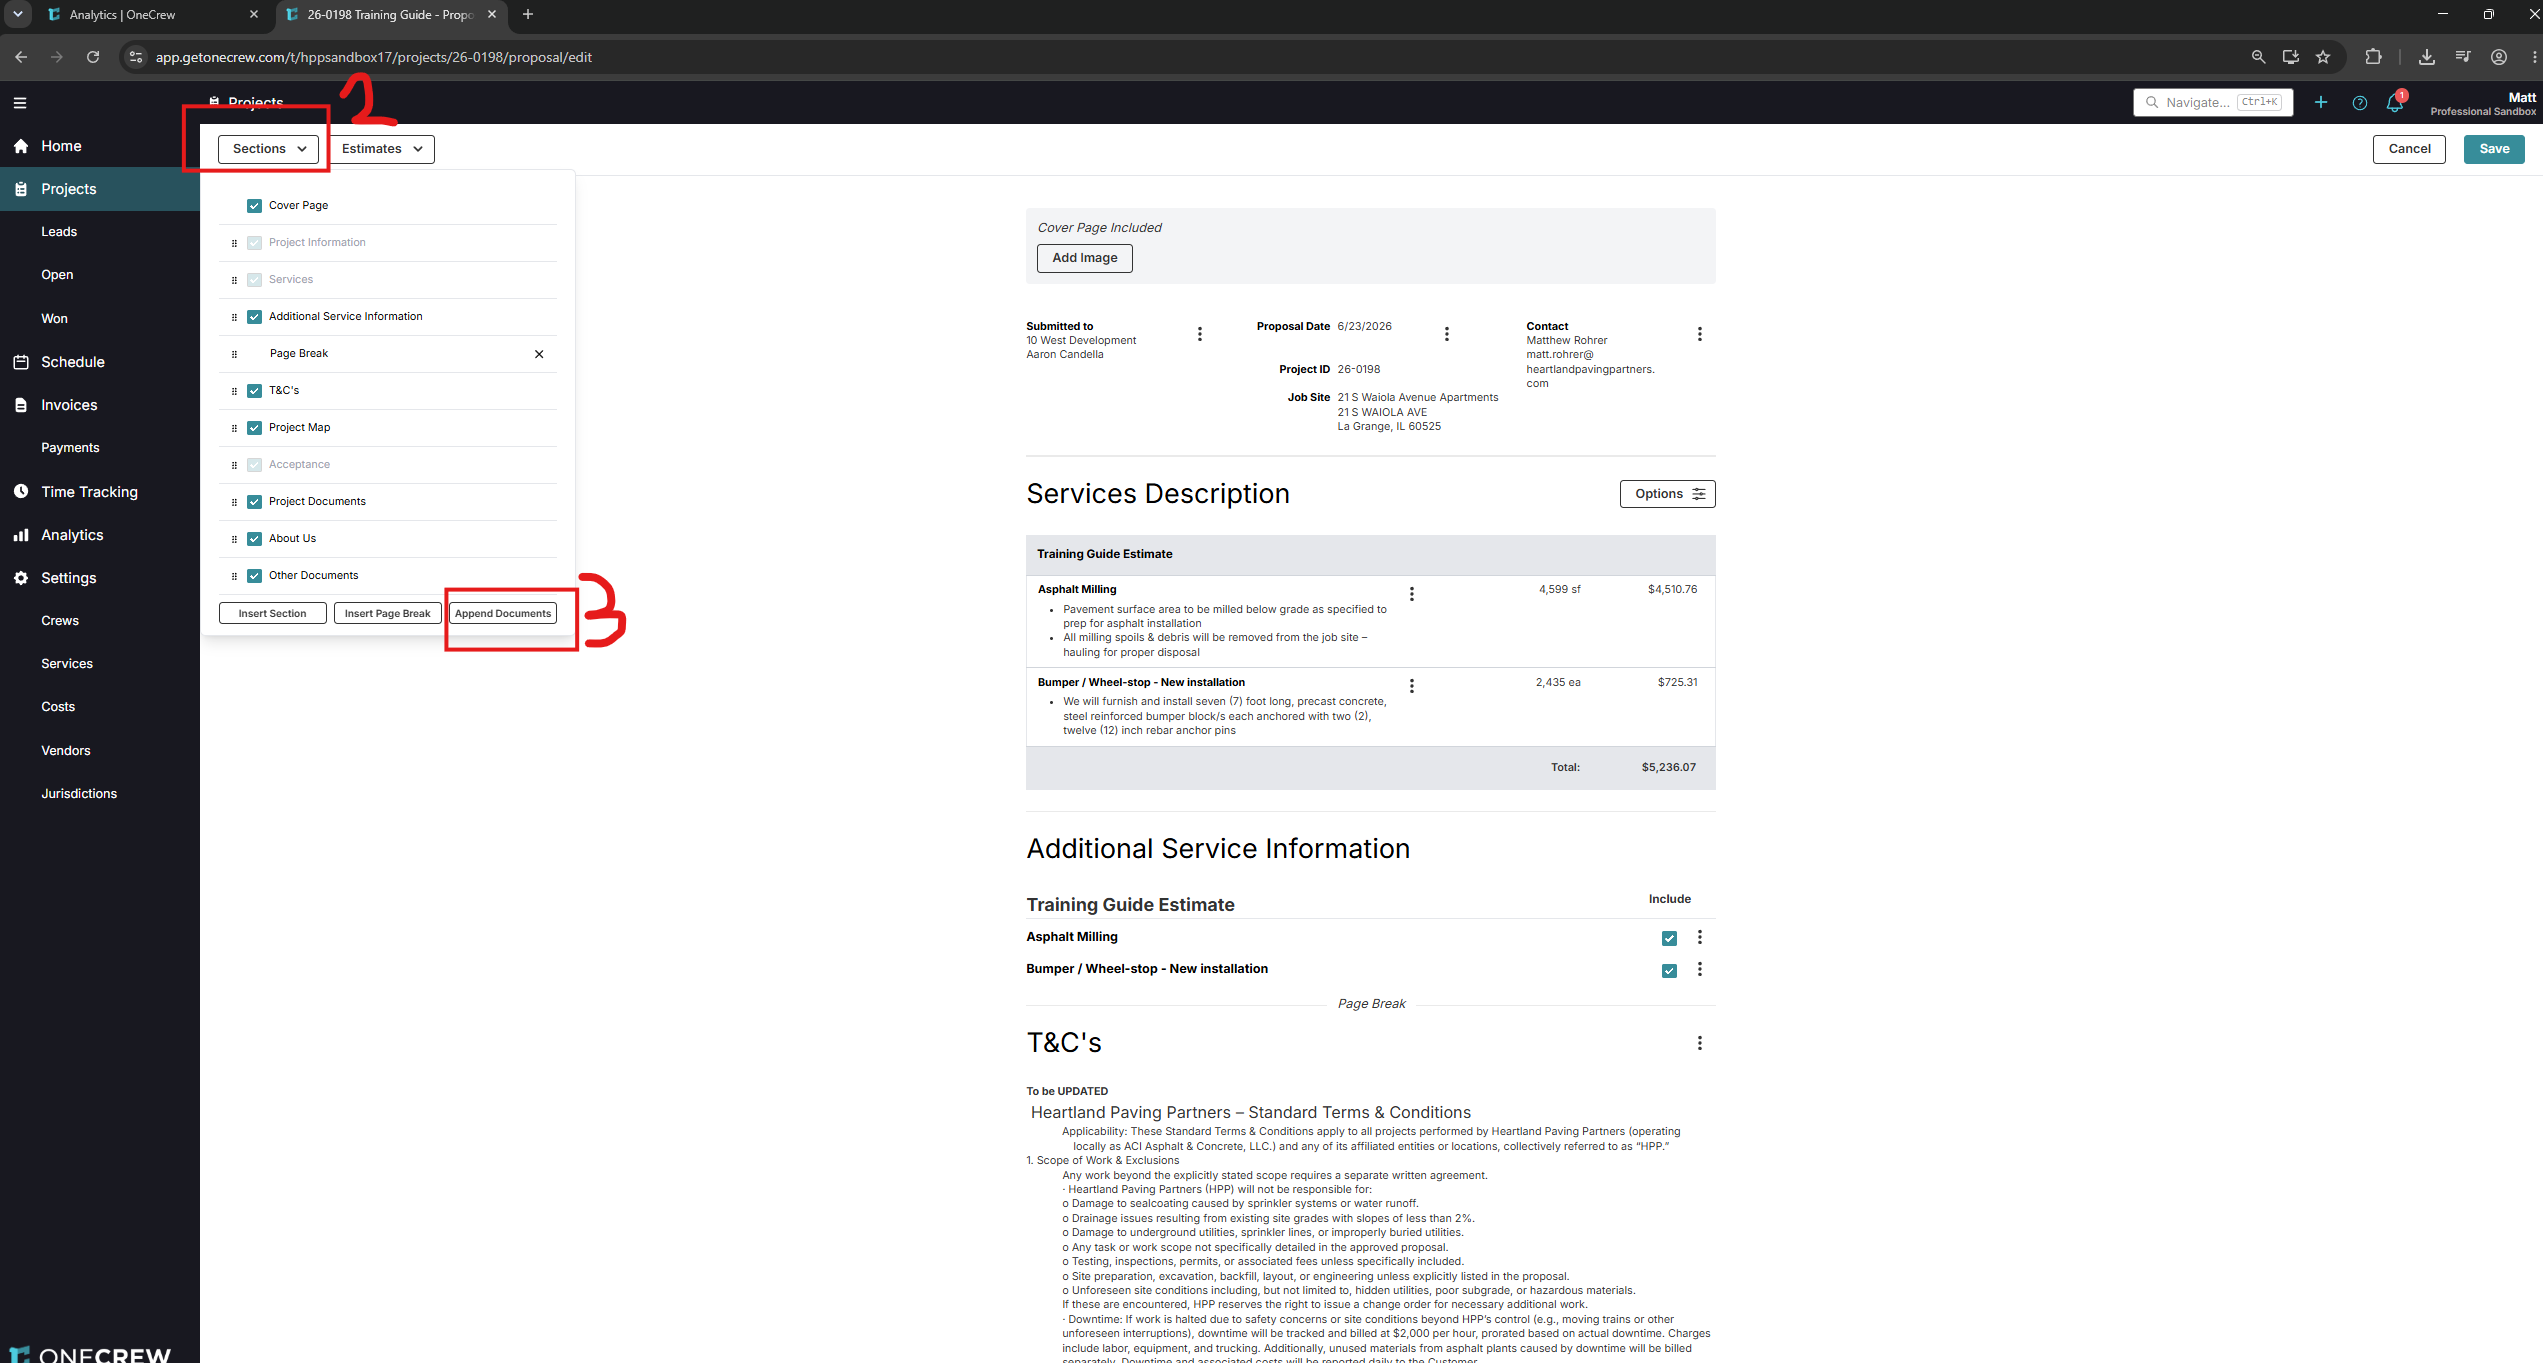
Use Append Documents for PDFs, terms and conditions, specifications, full-page images, and other standalone files that should appear as separate Proposal pages.
Use the Sections control to add, remove, or reorder Proposal sections. Drag and drop sections when the order needs to be changed.
The Project Documents section accepts images. Use Append Documents for PDFs and other full documents.
Use Append Documents to add PDFs and other full-page files to the Proposal.
Create the Proposal
Once the Estimate is complete, return to the Project page and click Proposal.
OneCrew uses the Project and Estimate information to create a prebuilt Proposal. Review the Proposal carefully before sending it to the customer.
Confirm that the following information is correct:
Service names and descriptions
Quantities and units of measure
Pricing and payment terms
Customer and Project information
Included Proposal sections
Any section with a three-dot menu can be edited. Service descriptions can also be adjusted to better reflect the job-specific scope, customer expectations, or bid requirements.
Save and Edit the Proposal
When the Proposal information and documents are correct, click Save in the upper-right corner.
A Proposal can be reopened and edited while it is still live and has not been signed. Use the edit option to make changes, then click Save again.
Send the Proposal
There are several ways to deliver the Proposal:
Download the Proposal as a PDF
Copy the live Proposal URL
Send the Proposal directly through OneCrew
The recommended method is to use the Send button in OneCrew. This keeps the Proposal connected to the Project and allows OneCrew to track customer activity.
Before sending, review the following:
Email template
Customer email address
Cc and Bcc recipients
Reply-To email and display name
Subject line
Email message
Proposal PDF attachment
Proposal link
Review all information, then click Send Email.
After the Proposal is sent, the Project status changes to Proposed. OneCrew also displays whether the Proposal was sent or opened and may show the date and time it was opened.
Accept and Sign the Proposal
HPP's standard method is to use electronic signatures. Some business units may also allow paper signatures, so confirm the accepted process with your manager.
Electronic Signatures
The Proposal email must include the {Proposal Link} variable. This creates the secure link the customer uses to review and sign the Proposal.
When the customer signs electronically, OneCrew automatically:
Notifies the assigned salesperson
Updates the Proposal status to Accepted
Stores the signed PDF in the Proposal section
Records the acceptance date
Makes the signed Proposal available for viewing or download
E-signed Proposals do not need to be uploaded again to the Documents tab.
Paper Signatures
Send the Proposal with the PDF attached.
Have the customer sign and return the document.
Upload the signed Proposal to the Project's Documents tab.
Change the Project status from Proposed to Accepted.
Confirm the Accepted Scope
When the customer selects from multiple Estimates or Optional Services, confirm the accepted scope in OneCrew.
Select the accepted Estimate and any Optional Services approved by the customer. Confirm the selection so the Project total and scope reflect the customer's final decision.
The accepted Estimate is then locked and becomes the basis for the Work Order.
Troubleshooting
Proposal Button Is Unavailable
Confirm that at least one Estimate has been created for the Project.
Customer Cannot Open the Proposal Link
Confirm that the {Proposal Link} variable was included, the link was not broken in the email, the customer checked their spam or junk folder, and the Proposal was sent to the correct address. Resend the Proposal when needed.
Optional Service Is Missing During Acceptance
Confirm that the Service was marked Optional when it was added to the Estimate. Required Services are included automatically.
Work Order Button Is Unavailable
Confirm that the Project status is Accepted. The Work Order cannot be created until the Proposal has been accepted.
Next Step
After the Proposal has been accepted and the final scope is confirmed, continue to Prepare the Work Order / Change Order.